Hints and Tips
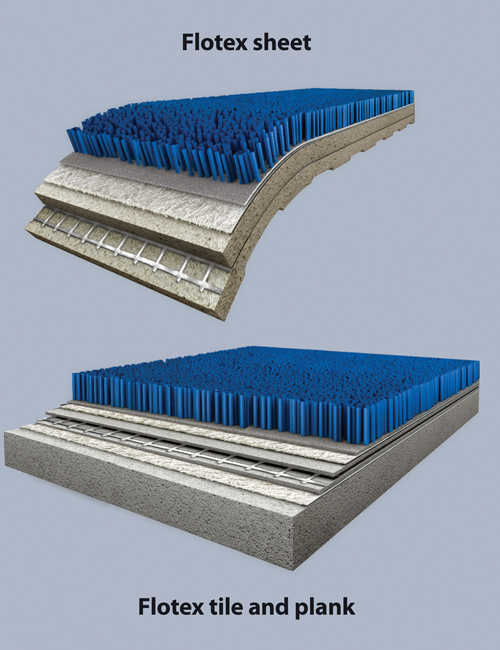
Flotex is neither a carpet or resilient floor rather, it is a mix of both. A heavy duty waterproof resilient bottom with a high-density 6.6 nylon textile top. It is also known as flocked flooring due to the electrostatic production process.
Flotex has existed for some time, however, never has it been so advanced in design offer with the introduction of digital printing. The hygienic, asthma and allergy friendly properties have also seen Flotex become a popular choice in education and care environments.
Installing and caring for Flotex sheet is rather simple, however there are some key points that will make your life easier and installation perform from day dot.
Usual rules apply for subfloor prep, clean, smooth, permanently dry and free from contaminants. In short follow the national code AS1884-2012 floor coverings resilient sheet and tiles installation practices.
Rolls should always be stored standing upright and acclimatised on site, storing the rolls laying down will result in pile crush. Use material from the same batch/dye lot and install in roll number sequence.
Direction of laying and pile direction
Always pay attention to the direction and planning of the sheets to avoid cross seams in areas of heavy use or doorways. Install sheets with the arrows all pointing in the same direction, the arrows on the back of the sheet indicate the pile direction.
Note: When installing Flotex sheet in corridors, always run arrows lengthwise for ease of rolling traffic. Where corridors intersect, it is recommended that a decorative border be used as a separator to avoid pattern cross match at the intersection. Lay the sheets edge to edge and direction of the arrows should point towards the main light source, NEVER AWAY.
Adhesive recommendations and application
Use a low emission EC1 adhesive such as Forbo Low VOC 640 Eurocol this also allows for a full system warranty. Use a clean V1 trowel to apply the adhesive evenly including right up to sheet edges. Be aware of the required waiting and open time. Always clean away excess adhesive with a damp cloth before it dries. Do NOT use bleaching agents or strong solvents as they can be harmful to both people and to your floor.
Installation
Flotex sheet factory edges are trimmed ready to be bonded firmly together, the edges do not need additional trimming. Protect from heavy traffic, particularly wheeled traffic, for 24 hours and do not wet clean for 48 hours after installation. Keep seams a minimum of 15 cm away from any subfloor joints such as expansion joints, saw cuts, etc. Allow for the pattern repeat. Allow at least 5cm trim at ends. Dry lay the runs, butting the factory edges for seaming. Make sure that the seam edges come together with a net fit with no fullness or gaps and check the pattern match. Trim off surplus. Roll the sheets back onto themselves to approximately half their length. Take care that the sheets do not shift during handling. Mark the position of the outside edge of the first sheet in pencil on the floor. Apply the adhesive to the line, marking the edge of the first sheet. Feed the first sheet into the wet adhesive (after the appropriate waiting time specified by the adhesive manufacturer) following the pencil mark on the floor.
Roll the sheet in all directions with a heavy roller (50-70kg) or press into the adhesive with a rubbing board within the open time of the adhesive. Working from the centre to the edges to remove any air bubble. Areas that cannot be rolled with the large roller such as door frames or skirting boards use a hand roller or rubbing board. Trim off excess floor covering along the walls and skirting boards. Do the same for the opposite half of the sheet and remaining runs making sure edge to edge seams are neat and tight.
Laying Flotex to a staircase
Flotex sheet is suitable for use on stairs, following these guidelines:
- Nosing should always be used in accordance to NCC requirements.
- A separate piece of Flotex must be used for each tread and riser.
- Use contact adhesive only for the risers.
- On the tread, the pile should lay (arrows) towards the nose of the step.
- For the riser, the pile should lay (arrows) downwards towards the tread.
Care and maintenance – The brilliance of Flotex
The 100% washable and waterproof backing combined with up to 80 million upright nylon fibres per m2 makes Flotex, easy to care for and an incredibly functional floor approved by the British Allergy Foundation. Heavy traffic and contaminants are no issue, as Flotex releases 30% more dirt when cleaning than conventional loop pile carpet. Think childcare centre, all sorts of stuff can end up on the floor.
Day to day, just vacuum to remove any loose dirt or dust and preferably with a motorised brush. Spills and stains can be cleaned buy using warm water and a cloth. Stubborn stains use a brush and plastic paint scraper with mild detergent. After considerable time and use, a wet clean may be necessary to refresh the space. Make sure to use a Flotex suitable, highly diluted PH neutral detergent. Mechanical wet cleaning is possible with a three in one, rotary or cylindrical machine. A brush and wet vac can also be used. Flotex is fast drying so a school environment can be completely refreshed to as new quickly. Flotex really is a product for those tough environments where loop carpets struggle to maintain appearance.
Flotex is available in sheet tile and planks. To find further technical tips on Flotex visit www.forboflooring.com.au.