Understanding the effects of the amount of water or additives used with renders, mortar beds and skims is important for a successful installation.
Greater surface flatness tolerances for the direct adhering of tile using the thin-bed method to concrete and other substrates is increasing with the growth in tile size and rising consumer expectations. More recent specifications for substrate flatness, like that in the Tile Council of North America (TCNA) handbook or Gauged Porcelain tile panel/slabs manufacturer’s manuals, are far tighter than the current suggested surface tolerance of 5mm in 3m for thin-bed fixing in AS3958.1 – 2007.
In fact, the TCNA calls for a flatness tolerance of 3mm in 3m from the required plane and 1.5mm in 600mm from the high spot to lay such large format tile (any tile with one edge longer than 381mm) and no doubt is commensurate with what should be stated in any Australian tiling standard of the future.
With the ever-increasing tile format sizes, a greater level of dimensional correction will be required for these substrates, and needs to be allowed for. These tighter tolerances have to be incorporated in any application of waterproof membranes, uncoupling mats, sound mats and other system components used with a large format tiling system when using the thin bed method of installation.
In the normal course of tiling, we correct surfaces with applications of mortar beds, renders, skims and self-levelling compounds to bring them in line with the required tolerances prior to installing system components or tiling. For mortar beds and renders, you have a choice between site mixed sand/cement mortars or higher performing proprietary mortars.
Proprietary products come with far better physical properties and capabilities and they generally exhibit better bond and compressive strengths, are more flexible, normally denser and can facilitate shorter wait times to the next stage of the installation. They are the preferred choice, particularly where permanent or “heavy duty” installations are required.
Most are capable of being used from feather edge to the desired thickness resulting in the ability to do localised surface correction only, not the whole job. These products are designed and more suited for surface correction, unlike tile adhesives. (Note: Many tile adhesives can be used thin skims or shallow patching and allowed to dry prior to the tile laying operation. However, they are generally not designed to be used during the actual tile laying process to correct substrates tolerances or build in falls. Many tile adhesives also make good slurry bond coats. After all, if we have to bond tiles to surfaces to a standard, why should that not apply to a mortar bed which is part of the tile system?)
So after surveying the area to be tiled, decisions can be made regarding the level of correction required, ie. which process or processes can be used to bring the work into tolerance, and how best to prepare the surface.
Ideally, concrete surfaces should be free of crystalline waterproofing additives and have a clean, dry, tight wood float or open pored steel trowel finish prior to correction. Curing compounds, sealers, oils or any other surface contaminations that inhibit bond will need to be removed. I have found that self-dissipating sealers and bond breakers need to be mechanically removed. Concrete surfaces that have been screeded or tamped only, are regarded as not suitable for bonded systems and will need to be rectified prior to commencing work. This will generally require mechanical removal to expose the aggregates in the concrete surface. As a matter of course, surfaces to receive self-levelling compounds generally require bead blasting.
Necessary guidelines
When using mortar beds, bond coats, renders or skims, it is important to follow guidelines on performing the specific process, as misuse can result in problematic installations like delamination, drummyness, lifting, cracking and the like. For instance, mortar beds/renders can lift due to; insufficient preparation, incorrectly batched and mixed materials, working in extreme climate, differential drying and the like.
However, the main point is to ensure end-users have the correct moisture content for the thickness of the mortar being applied and that it is able to wet out the surface to which it is to be applied, whether that be a render, screed or skim. A large percentage of my experiences with problematic renders/screeds has generally been to do excessively thick applications over both adequately or inadequately prepared surfaces.
For correctly graded site mixed sand and cement or proprietary mortars, wet plastic renders need to be applied initially in a 12mm layer and allowed to dry before the application of any subsequent layer where a build-up is required. It’s not too hard to go to a job where render has delaminated to find the affected areas are in fact single layers very much thicker than well bonded adjacent areas of the correct thickness.
If using wet plastic mortars to render walls and floors, stick to the proper application thicknesses. It’s often best to look for the low or depressed areas and fill them first in how many layers required so an even and more consistent float coat can be finally applied. Scratch the surface and allow to dry between layers. Wetter plastic applications of proprietary mixes don’t generally require a bond coat and should be able to be applied directly to the prepared surface.
For correctly graded site mixed sand and cement or proprietary mortars, semi-dry screed beds need to be applied over slurry bond coats. This is because they typically don’t have the ability to wet out the surface they are being applied to and in particularly, site mixed sand and cement mortars don’t have sufficient binding ability to provide any meaningful bond on their own.
Typically, proprietary bonded mortars can be applied from feather-edge to 50mm in a single layer. For layers greater than 50mm, apply in multiple layers not exceeding 50mm or in single layers incorporating wire mesh centrally. I have a preference for multiple layers, they seem to a more reliable way of building the beds.
When applying from feather-edge to 12mm, use wetter plastic mixes like that of a render. Layers over 10mm thick should be of a semi-dry consistency. This is a mix that will hold together in a ball when squeezed in the palm of your hand and present with a slight sheen. These types of mixes work well with a straight edge, compact easily with a float and finish to a smooth finish with a trowel.
The danger is over wetting thicker mortar beds. This may result from incorrect mixing or a belief that increased workability will increase productivity. Either way, over wetting thicker beds is likely to result in delamination. This delamination, amongst other reasons, is generally due to differential drying causing warpage or drying shrinkage over stressing the bond coat or both particularly when subjected to rapid drying.
One way to control the wetting out of the mix is to use a forced blade static drum mixer. These machines are excellent at maintaining consistent, workable mixes with the prescribed liquid. Hand mixing, especially in larger batches, generally encourages the installer to use more liquid than needed just to facilitate the mixing. Once again, scratch and allow to dry between layers where appropriate.
Step-by-step
The following points and guidelines will help ensure a successful permanent installation;
- Inspect the substrate and report or repair any condition that needs to be rectified before the work commences. Remove contamination or anything that may inhibit bond. Substrates should be structurally sound and dry. Then clean and hydrate the surface prior to application of render, mortar bed or skim.
- Ensure there is enough material to complete the work at hand.
- Work in conditions suitable for the materials you are working with. Protect from excessive heat, cold, wind, rain and the like during the installation and for a period after the installation. Consider working in temperatures that suit the work, even if it means working out of hours.
- Condition materials before use. Hot or cold liquids and powders behave differently when not conditioned. Temperature condition substrates if possible.
- For best results, good workability and economy of admix, semi-dry mixes are best when mixed in a forced blade, static drum type mixer. Wetter, plaster type mixes are best when mixed in a rotating drum mixer. Do not mix semi-dry mixes in a rotating drum mixer.
- When using wetter plaster type mixes for wall or levelling bed application to horizontal surfaces, do not apply greater than 15mm per lift after an initial first coat of 12mm. Scratch and allow to dry between lifts or coats where required.
- Work and force the material into good contact with the surface to be covered.
- Where bonded semi-dry mortar beds are greater than 50mm in thickness, use suitably graded aggregates in the mix and install wire mesh centrally as outlined in AS3958.1. Alternatively, install mortar bed in multiple layers less than 50mm thick. Scratch and allow to dry in between layers. Slurry bond coats are required between layers.
- Do not allow slurry bond coats to skin or dry out; re-apply fresh slurry bond coat over skinned or dried bond coat before applying fresh mortar. Do not apply slurry bond coats to areas that are not going to be immediately covered with mortar bed.
- Do not apply neat latex or additives as bond coats on their own unless advised by a manufacturer. May create plastic skins that are hard to bond to.
- Do not load surfaces and keep construction traffic of new applications till cured.
In the case of proprietary systems, speak to suppliers about training on the correct ways to use their products.
Story by Fred Gray, technical service manager, Laticrete Australia.
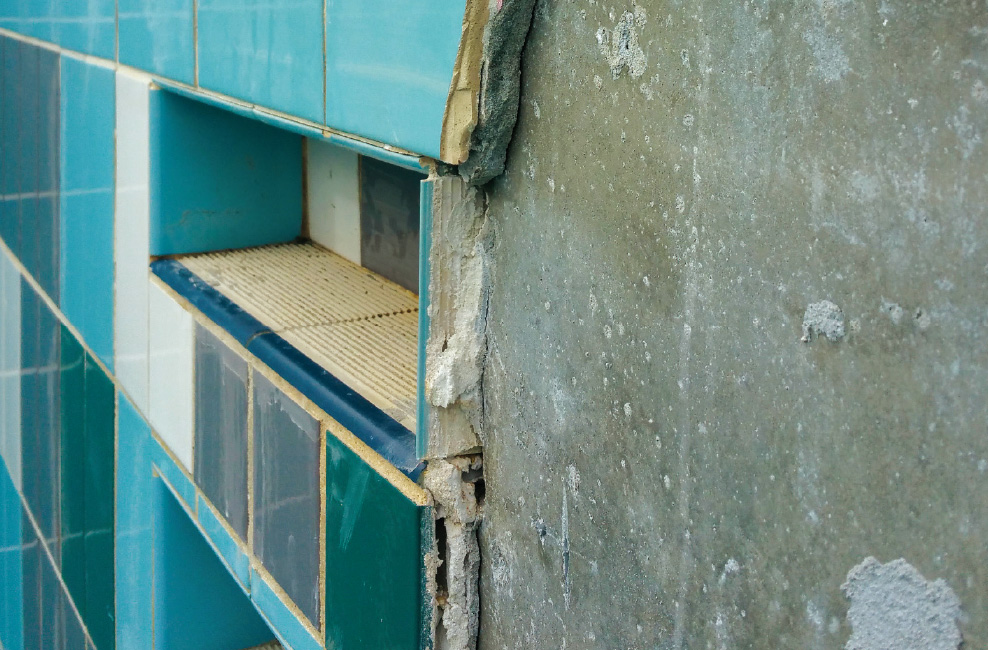
Pictured: The resulting delamination is attributed to an otherwise good render application being installed over a pure latex that was painted to the wall and allowed to dry.